Saturday, 25 April 2020

Strut your punky Stuff

Hi There everyone

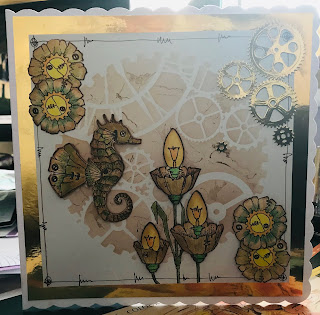
One of my loves is Steam Punk and what better to use than Chocolate Baroque’s Steam Punk stamps.


I first brushed Vintage Photo through a Stencil then stamped my images on to separate pieces of card. With the Seahorse I also masked him and extended his wing with adding a leaf from one of the punky flowers.  The main punky flower image was stamped onto the flat image - I then stamped the image again onto the card - coloured them in - carefully cut them out - edged with more vintage photo. I did the same for the flower heads.


I then put the card together - foam mounting the seahorse, the flower heads and the focal image of the main punky flower.

Lastly, I die cut some cogs.


Then the last finishing touches mounted on to gold mirror card and on to my base card.
Voila!

Hope you are all keeping well

Kim x


Wednesday, 15 April 2020

Thinking of you

Another make whilst the lock down continues - can it really be another week that has gone by?

As I sit in my craft room looking out on the sunny day the overall air is quiet - not the usual hustle and bustle of life - I suppose if I think back this is how Sundays used to be before Sunday Trading came in - the only difference was that we could go out a bit more than we can now.

So I find myself thinking of loved ones and in particular my Mum who is on her own down in London- so I thought I would make her a card - just letting her know that I am thinking of her.


I used a 7 x 7 card base for this make and made a white layer approx 6.6 x 6.5 with a slightly bigger black mat layer.

Then I turned to using Distress Inks - I think they get a little forgotten these days - I used Peacock Feathers, Weathered Wood, Mustard Seed and Mowed Lawn - then finding a small acrylic block to act as a stamp - inked it up with ink- took one impression off on to scrap paper and then second generation onto my white card - I built up my back ground layers until I was happy, overlapping them as I went.

Next I took the wonderful seed head from the Glorious seed heads set - I particularly loved this particular stamp from the set- I feel it is elegant and needs very little to show itself off. I stamped it used Versafine Clair.

Next I needed a sentiment - now that took me ages to find the one I felt was right - the normal Thinking Of You did not quite cut it for me - so I needed something a little more quirky but meaningful - so after a lot of searching back and forth I came to this one ‘A Penny Farthing for your thoughts’ - as I think we all spend quite a lot of times these days thinking a lot about what is happening around us. This stamp comes from the Punky Expressions set.....  a little odd for some maybe but it suited my thoughts.

Hope you like this little make - cards do not always need to be complicated - let the stamp do the talking and I think this one does that - it is detailed and elegant.

Thanks for reading

Kimmy xx

Wednesday, 8 April 2020

A Strange world we now live in

Hi Everyone


How is everyone coping in this strange new way of living we find ourselves?

As I write this life is very unknown - will my place of work survive? I work for a Charity Heritage Railway in Peterborough - we have had to close our doors given all that is going on - so it is all very worrying - so I find turning to craft will be one of the ways forward to seek some solace and calm my wandering thoughts!

I made this card today - using Chocolate Baroques wonderful Freesia Blueprint set - such a beautiful flower in real life with a lovely fragrance and speaks of pleasant sunny days and happy times.


This card is on an 8x8 card base - I used a white layer measured at 7.5 x 7.5, for stamping on and then mounted on to a piece of red card measured to 7,75 x 7.75 (all measurements are inches)

On the white layer I first used a circular mask - you could use a stencil or paper with a circle cut out - I found a size that enabled me to make it as though it was a snap shot of the focal point of the main flower.

I then used Spun Sugar Distress Ink and with a soft brush built the colour up in several layers - lifting the stencil/mask to check my progress until there was enough colour to my satisfaction. Once I was happy with the level of colour I then stamped my focal image through the stencil/mask and then carefully removed the stencil, using Black Versafine - I find that Versafine brings the delicate lines of the image right out.

My next step was to colour in the flowers - I am a lover of Faber Castell as they just suit me - however you could use any medium of your choice or indeed watercolour paints. I gently built the layers of colour slowly and steadily until I was happy with my focal image.

My next step was to stamp the corners - with the stamp set is the ideal selection of a section of a protractor - perfect for the job in hand - I used the same Spun Sugar - but this time in Oxide ink - this complemented perfectly as the chalkiness of the ink makes it perfect to stamp with - if you used the ordinary distress ink the image would not be as crisp - it would be distressed as the ink has an almost split effect when used for stamping.

I then took a black fine liner pen and went around the circle - I did not want a perfect circle - I wanted the wobbly look - probably reflects my current state of mind!

Lastly I used one of the sentiments from the set - perfect!

Finally in layered everything up - the red card complimented the pink perfectly.

I hope you like my card and cannot praise the set of blueprint images enough - they stamp beautifully - every fine little detail - exactly how you would see a blueprint !

Keep safe and well everyone

Kim xx