Saturday, 25 April 2020

Strut your punky Stuff

Hi There everyone

One of my loves is Steam Punk and what better to use than Chocolate Baroque’s Steam Punk stamps.


I first brushed Vintage Photo through a Stencil then stamped my images on to separate pieces of card. With the Seahorse I also masked him and extended his wing with adding a leaf from one of the punky flowers.  The main punky flower image was stamped onto the flat image - I then stamped the image again onto the card - coloured them in - carefully cut them out - edged with more vintage photo. I did the same for the flower heads.


I then put the card together - foam mounting the seahorse, the flower heads and the focal image of the main punky flower.

Lastly, I die cut some cogs.


Then the last finishing touches mounted on to gold mirror card and on to my base card.
Voila!

Hope you are all keeping well

Kim x


Wednesday, 15 April 2020

Thinking of you

Another make whilst the lock down continues - can it really be another week that has gone by?

As I sit in my craft room looking out on the sunny day the overall air is quiet - not the usual hustle and bustle of life - I suppose if I think back this is how Sundays used to be before Sunday Trading came in - the only difference was that we could go out a bit more than we can now.

So I find myself thinking of loved ones and in particular my Mum who is on her own down in London- so I thought I would make her a card - just letting her know that I am thinking of her.


I used a 7 x 7 card base for this make and made a white layer approx 6.6 x 6.5 with a slightly bigger black mat layer.

Then I turned to using Distress Inks - I think they get a little forgotten these days - I used Peacock Feathers, Weathered Wood, Mustard Seed and Mowed Lawn - then finding a small acrylic block to act as a stamp - inked it up with ink- took one impression off on to scrap paper and then second generation onto my white card - I built up my back ground layers until I was happy, overlapping them as I went.

Next I took the wonderful seed head from the Glorious seed heads set - I particularly loved this particular stamp from the set- I feel it is elegant and needs very little to show itself off. I stamped it used Versafine Clair.

Next I needed a sentiment - now that took me ages to find the one I felt was right - the normal Thinking Of You did not quite cut it for me - so I needed something a little more quirky but meaningful - so after a lot of searching back and forth I came to this one ‘A Penny Farthing for your thoughts’ - as I think we all spend quite a lot of times these days thinking a lot about what is happening around us. This stamp comes from the Punky Expressions set.....  a little odd for some maybe but it suited my thoughts.

Hope you like this little make - cards do not always need to be complicated - let the stamp do the talking and I think this one does that - it is detailed and elegant.

Thanks for reading

Kimmy xx

Wednesday, 8 April 2020

A Strange world we now live in

Hi Everyone


How is everyone coping in this strange new way of living we find ourselves?

As I write this life is very unknown - will my place of work survive? I work for a Charity Heritage Railway in Peterborough - we have had to close our doors given all that is going on - so it is all very worrying - so I find turning to craft will be one of the ways forward to seek some solace and calm my wandering thoughts!

I made this card today - using Chocolate Baroques wonderful Freesia Blueprint set - such a beautiful flower in real life with a lovely fragrance and speaks of pleasant sunny days and happy times.


This card is on an 8x8 card base - I used a white layer measured at 7.5 x 7.5, for stamping on and then mounted on to a piece of red card measured to 7,75 x 7.75 (all measurements are inches)

On the white layer I first used a circular mask - you could use a stencil or paper with a circle cut out - I found a size that enabled me to make it as though it was a snap shot of the focal point of the main flower.

I then used Spun Sugar Distress Ink and with a soft brush built the colour up in several layers - lifting the stencil/mask to check my progress until there was enough colour to my satisfaction. Once I was happy with the level of colour I then stamped my focal image through the stencil/mask and then carefully removed the stencil, using Black Versafine - I find that Versafine brings the delicate lines of the image right out.

My next step was to colour in the flowers - I am a lover of Faber Castell as they just suit me - however you could use any medium of your choice or indeed watercolour paints. I gently built the layers of colour slowly and steadily until I was happy with my focal image.

My next step was to stamp the corners - with the stamp set is the ideal selection of a section of a protractor - perfect for the job in hand - I used the same Spun Sugar - but this time in Oxide ink - this complemented perfectly as the chalkiness of the ink makes it perfect to stamp with - if you used the ordinary distress ink the image would not be as crisp - it would be distressed as the ink has an almost split effect when used for stamping.

I then took a black fine liner pen and went around the circle - I did not want a perfect circle - I wanted the wobbly look - probably reflects my current state of mind!

Lastly I used one of the sentiments from the set - perfect!

Finally in layered everything up - the red card complimented the pink perfectly.

I hope you like my card and cannot praise the set of blueprint images enough - they stamp beautifully - every fine little detail - exactly how you would see a blueprint !

Keep safe and well everyone

Kim xx

Tuesday, 3 September 2019

Hearts all around Me

Hi Everone

Some people who know me will know that I’m currently knee-deep in a house renovation which has brought the house to a complete halt on all things normal. The kitchen is currently in every room of the house as well as dining room furniture making crafting very difficult!  So the arrival of a new batch of stamps proved a challenge in more ways than one!  As a consequence, I only took two photos before posting off and have realised the sun has featured on the photos too! But in my defence being surrounded by dust, dirt and noise on some of the hottest days of the year did prove challenging!   
The introduction of Heart Trading Cards is just fab!  I already love doing the coins so this brings another unique dimension to play with!

https://drive.google.com/uc?export=view&id=1CPw3i54nkzaSg6P-lYsr2W_X4v5dwFPE

Hope you enjoy the stamps and can’t wait to see what the others have done!


Monday, 5 August 2019

Lots and Lots of Houses!

Hi Everyone!

So here I am, month two of being part of the CB TV Design Team, what exciting stamps were going to drop through the letterbox I wondered!

When my envelope arrived I opened it eagerly, its a bit like getting a birthday or Christmas present as you don't know what you are going to get!

Inside were four styles of houses which can be found in various places around the globe - along with some beautiful sentiments.

So first things first, trimming and mounting to cling a ling. I find when I do this it helps me to start getting the ideas flowing - then stamp them out onto copier paper before starting to plan the ideas.

With work being quite hectic at the moment - a fast approaching kitchen install - there was no time to dilly dally - so I hope you like my makes!!

My take on an Adams Family Halloween style - distress inks and hand-drawn bats

I felt this could be Amsterdam - so grey stamped in the background and decoupaged up in the front

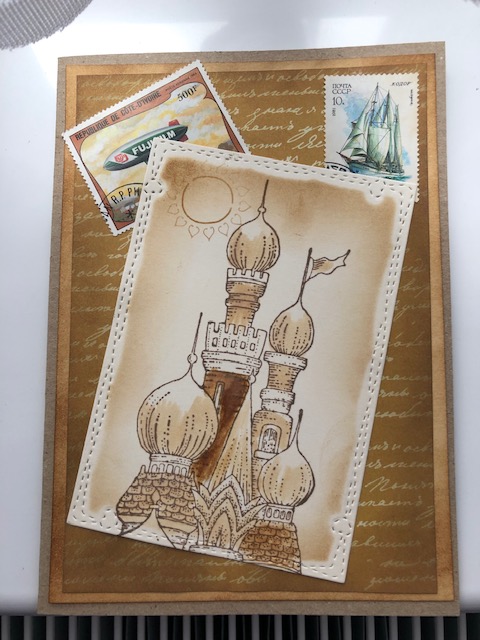
So so Russian - Dr Zhivago came to mind - paper pieced this one

Postcard sepia style - with some authentic postage stamps added

This one was my idea of the blueprint behind the architect in tag form

All about the caption this one in monochrome with a highlight of colour  

This house held a monastic feel for me - this is on watercolour card

A bit of quirky fun with this one as it could be a grandfather clock or even a bit of Back to The Future about it

Mica powders for this one 

Last but not least - this one is all about the caption and colours

Tuesday, 2 July 2019

Exciting Times!


Hello Everyone!

Its been a very long time since I have blogged - so long I have almost forgotten how to do it!

Much has changed since I last blogged not least of all a change of job! But more of that another time.

I was lucky enough to be chosen to take part on the Chocolate Baroque Craftalong on Hochanda a couple of months ago - much excitement on going to Oundle to Hochanda HQ - meeting Lesley and David and then a fellow crafter called Christine Patch - who was also one of the lucky ones - Christine runs a blog and did a wonderful blog of our day out at Hochanda;

Christine Patch

It was a fabulous day - a mix of sheer enjoyment, nerves, laughter and fun!  My friend Sue came with me for moral support - she too had a marvellous time mixing with others in the Green Room - namely the lovely ladies from Pink Ink Designs!

Since then day to day life has plodded on as it does - monthly craft workshops, more work etc - but all of a sudden there was a post on FB - a call out for applications to become a DT member for Chocolate Baroque!  My friends gently nudged me and so I applied and waited.

Then - on a day when I was about to go to a hospital appointment, an email from Lesley to call David ASAP - so I duly did and was oh so happy to hear I was being offered a position and if I was happy to do some samples for an upcoming show, would receive stamps the very next day!  This truly brightened my day - made the hospital appointment a little more bearable!

So without much further ado - here are my samples - I hope you enjoy them and help provide a little inspiration!!!


Tuesday, 18 October 2016

#44

Circles and Squares


Hi There Everyone!

Its been a while since I blogged and entered a challenge - one thing or another life has its knack of getting in the way - like my Mum turning 80, work being never ending and oops here we are mid October already!

This months title pulled me in - Circles And Squares - took me back to the 70's and 80's..... Spirograph and colouring books that were geometric patterns.

So out came the groovi folder and off I went with the nested Circles and Squares;


Next I started pricking some pf the arcs using my diagonal pricking grid;


Then I started on my colouring and white work;


And finally the piquet edging before mounting on to a complimentary colour using tiny brads.

Hope you like it!

Crafty Hugs and Winks

Kim xx


Sunday, 28 August 2016

Fussy Cutting - Clarity August Challenge


Well it's been a while since I blogged but this months challenge tempted me to get creative and find some time to make a card and blog it, so here goes!

My first step was to blend four distress inks together that spoke Autumn to me.... I just love the colours of Autumn and every day for the last couple of weeks as I drive to work I see the early signs of Autumn beginning.

Once I had blended the inks I lightly spritzed and then blotted with some kitchen roll and then let it thoroughly dry.  Once dry I then stamped in Sepia Archival as many leaf stamps as I could along with the Autumn sentiment.


Then came the fussy cutting with scissors and craft knife


Flipped each leaf over and blended some of the vintage photo ink to take away the white edges 


And lastly started to shape the leaves with a ball tool, keeping some flat and then gradually getting deeper.


Lastly I arranged them all on black card ( as I felt this really made the colours pop) to resemble a pile of fallen leaves and then placed the sentiment to the side.

Hope you like it! 


Sunday, 10 April 2016

Clarity Calendar Challenge 4


BIRDS IN A ROW


Well hello everyone - 10th April already! - where is this year 'flying' off too LOL - seriously though - April already - Christmas only seems a couple of weeks ago.....

Well today it took me two attempts before I settled on this one - not having a canvas with some colour on already proved a challenge and then trying to match colours when I didn't have them - so this is take two which I am really happy with - so I hope you like it too!!


Much Love

Kim xx


Tuesday, 22 March 2016

Calendar Challenge 3

So here is my entry for this months Calendar Challenge... On the face of it you think oh that's going to be hard... But follow the step by step and you're well on your way!
Hope you like it and I love this sentiment.


Much love Kimmy

Sunday, 20 March 2016

All About The Girls

Hi there everyone,

Another month and another challenge.... this month is All about the girls - well I am not a girly girl, never have been - much to my Mums despair!! I love looking at girly things - admire much of it, but am not one for bright and flouncy things - so when I thought about what I would make I steered away from anything really girly as its just not me!

Like most people I surf the net for inspiration and discovering new techniques .... well new to me.

Recently when sharing a crafty session with friends I was introduced to the wonderful world of masterboards and have since spent many hours watching YouTube clips to get the ideas and the process - so I decided this was my starting point.

I took a plain piece of card and a small perspex block which I wrapped some thick twine around, took  a Meadow Adirondack ink pad and started stamping an alternate criss cross design across the card base - it was subtle - but I liked it.

Next I brayered in a mix of Wild Honey and Spiced Marmalade Distress ink pads to build up the colour, then - using the small leafy swirl stamp - I stamped second generation Vintage Photo Distress Ink.

I then took the large and small Gerbera Stamp - and using Black Onyx Versafine - stamped part of the card.

I then stamped my sentiment - January NDC 2016 - Life is Just Not Long Enough - so very true for us crafters!!!

I then used my distress ink marker pens to colour in the flowers and highlighted them with a wink of stella pen - just to add a bit of glimmer (sadly the photo does not really show this).

I then chomped my corners and mounted this on to black card and decided to go for a Kraft Card Base - but it looked in need of something - after much back and forth with various embellishments I settle on some burlap.


Hope you like it!

Much Love

Kimmy xx

Friday, 19 February 2016

Clarity Calendar Challenge 2

Hello everyone

Have had a lovely day off work today spent with some great friends. 

We all had a go at the Calendar Challenge for this month and this is my attempt!

Am really pleased with the outcome as I love this stamp - hope you all like it!


Sunday, 14 February 2016

Love - Clarity February Challenge


Well Hello there on this rather chilly Valentines Day!

I have been playing around with my clarity stamps, pencils, acrylic paints, glossy accents some ribbon and a few heart shaped buttons!

The first thing I did was drawn a heart lightly in pencil on to a piece of card - then I created a post-it note mask for the posy stamp - from the bike and posy set  - next - using archival black ink - I started to stamp around my pencil line carefully masking one set before stamping the next until I had created a heart shaped wreath of flowers.

Next - using the wordpress letter set  I stamped out Happy Valentines Day. I coloured in the flowers with my colouring pencils and then carefully cut the shape out and mounted it on to some coloured card stock.

Next I dry rolled acrylic paint on to some white card stock - I used avocado and pink - using a red small brayer - the red roller gives a different effect than the softball brayer - you lightly walk the paint over the card. I then stamped the dragonfly stamp from the Lucky set (lucky in love) - and then brayered over the top with the metallic glaze from the paper artsy chalk paints set.

Matting and layering came next - on to black card with the corner chomped with a heart shaped top - some lemon ribbon tied with a bow, the heart is mounted on foam pads and finally some heart shaped buttons!

Hope you like it!

Kimmy xx

Wednesday, 20 January 2016

Clarity Challenge

Clarity Calendar Challenge

Hi everyone

Today on Barbara Grays blog she has set the task of people challenging themselves... You know, that reach for the stars approach!
So today I have made a start by firstly add two blog links to my page and - all things being equal - added a link to the new monthly challenge at the top of this blog!

You know that saying... You learn something every day... Well today I have just by being challenged !

So the next step is to actual submit a piece of work on that link above !  .... See you all on the other side - are you up for a challenge too?

In the mean time a little bit of Clarity Stamp meets Groovi.

I watched Maria in Crowborough last summer where she demoed stamps and groovi together. First stamp your chosen image in archival, heat tool to dry the image, flip over and groovi to your hearts content and colour in your stamp - on this one I used pro markers- mounted on card with the punched corners.

Much love
Kim

Saturday, 19 December 2015

Christmas Story

A Christmas Story..... this could be the traditional Nativity Scene, or a Christmas Story such as 'Twas The Night'... all so deserving of art work - but for me I wanted to show something that was personal to me.

A year ago I was happily travelling from SE London to Peterborough every couple of weeks to take part in different Clarity Workshops...bit by bit I was falling in love with the area ... a pipe dream was developing ... wouldn't it be lovely to live there.

Well - a year later I find myself actually living in Peterborough! - an eventful year of complete life change of both work and home... all of which has made me a much happier person.

So why Holly and why Groovi... Groovi...one of the best inventions of the year for me..Parchment one of the crafts I have always failed at since I was a teenager... so embracing Groovi has been a turning point in my crafting skills....taking it a step further by now attending a monthly workshop locally in Peterborough, where I am learning the traditional side of parchment - but able to mix with the modern Groovi. Holly spoke to me as soon as I saw her.... and so my scene developed...Holly is walking the road to Peterborough through the drifting snow... where she will celebrate her first Christmas in a new home.

I have made this card for my Mum for Christmas.

Hope you like it

Thanks for Reading

Much Love

Kim

Wednesday, 26 August 2015

BINGO! Full House


Well it's been a long while since I entered the challenge so I decided to go for the full house.  I started with three blank beer mats that I die cut to hearts. Next I painted them with white gesso and then when dry painted them with a pearl green acrylic paint. On one heart I used the double vine stencil and after mixing some paint with Grunge Paste pulled it through the stencil, removed the stencil and set asside to dry, just before fully dry I brushed kiwi perfect pearls over the top. On the next heart I used the florabunda stamp, using glitter glue I randomly stamped on the heart before applying gilding flakes which I brushed off, I also used the same glue to go around the edges on both hearts applying the flakes as I went.  On the last heart I used the smaller leafy swirl stamp and randomly stamped second generation, I then stamped the clarity tiny birds and then the sentiment. I then used my glue pen and highlighted areas and sprinkled with glamour dust. Then I moved to shrink plastic... Stamping a Clarity butterfly in permanent ink, lightly coloured it in, cut out before applying heat to shrink it!  I then used my heat gun to stick it the the heart. Lastly I used my crop-a-dial and punched holes and applied the rivets before threading together with some ribbon.  Oh and finally brushed the whole thing with some gold gilding wax!

Hope you all like it!

Hugs and kisses
Kim xx

Tuesday, 19 May 2015

Clarity Stamp May Challenge - Clocks

Well here I am - earlier than last month - but as I am currently enjoying so R&R between jobs its enabled me to get ahead.

So. . . . this months challenge is clocks. . . . clocks = TIME.....and for me it is very much a TIME for change.

So this card is representing a journey - my journey of feeling very low about a job I used to absolutely love - resigning and starting a new job - starting on the 1st June at 9am to be precise, and moving from London to Peterborough - quite a thing for someone who has lived all their life in one borough!!

So what better way of representing this, than in a card!.

I combined the Clarity Bicycle Stamp with the small watch stamp - which by chance shows a minute to 9!!( The time I have to report at my new office)!  The jaunty angle upwards represents my upward journey to my new job - I drew on a flag leaning backwards to give the impression of motion and coloured it in red - my favourite colour - the wheels (clocks) I shaded and put glossy accents on. Next I made a swirly background using the shaving foam method and delusions (the swirls representing my state of mind over recent months) - and lastly I stamped out the sentiment of 'Time for a change' in red on more shaving foam backgrounds and just for a change for me instead of using the square boxes I used the hexagon ones! Mounted them all on foam sticky pads.
Lastly instead of a straight edge on the background I used some deckle edged scissors - even more of a change!!

So ..... lots of So's here!!! - I hope you like it and my story behind the card.

Thanks for stopping by

Much Love
Kim x